|
I am really keen to develop a series of video resources to use in the classroom. Students' attention spans are like museum visitors' - fleeting. If they are given the opportunity to learn by watching shortened clips with embedded questions and audios - will that be more engaging? I found a few great resources to use and shorten web-based videos for the classroom. So far, my favourite is EDPuzzle. I've collected the resource on my Scoop.it page and posted it on my Twitter feed (click icon for link). I'm still looking for ICTs to use in the classroom along the video/digital story lines. So if you have some ideas or resources, please comment below - I'd really appreciate your thoughts :)
2 Comments
I've had a twitter profile for a few years, but I've not had the urge to tweet - until now. After starting my Scoop.it collection and linking it to my Twitter account, I'm hooked. Unfortunately, I don't have enough time to investigate too much at the moment. I've been following a few Twitter accounts and the more I follow, the more great suggestions pop up. I am beginning to see the real value in this site. I have LinkedIn, Facebook, Instagram and Snapchat, yet I really don't explore them much and use the last three to keep in touch with friends and family. I use LinkedIn for professional purposes, and have found some wonderful resources, articles and slide-shares along the way. LinkedIn is a great networking tool and I have made some fabulous contacts all over the world. To my surprise, some really cool Scoop.it peeps have started re-scooping from my collection and posting it on their Twitter pages - I'm starting to build a whole new world of contacts. Now the collaborative aspect comes into play. I can see who they follow and can start accessing other resources and opinions. Participants can share their knowledge and access a worlds's worth of information. People can view my connections and interests too - thus a global community is activated and expanded.  By Peeragogia (Own work) [CC BY-SA 3.0 (http://creativecommons.org/licenses/by-sa/3.0)], via Wikimedia Commons By Peeragogia (Own work) [CC BY-SA 3.0 (http://creativecommons.org/licenses/by-sa/3.0)], via Wikimedia Commons Most students already have their own personal learning network via the plethora of social media apps available. What we need to make sure, in an education context, is that they are accessing the appropriate material, connecting with and listening to helpful people who will enhance their learning. We want students to collaborate too - not merely compete with each other. Viewing Facebook posts about the wonderful trips and activities that their friends are participating in can lead to feelings of inadequacy. Teachers need to ensure that students learn how to work WITH each other not just compete in an online group environment. The types of activities we ask them to undertake must be considered and authentic, with direct learning goals, creating outcomes which involve high order thinking processes. Social media posts are not only about airy-fairy topics, but finding meaningful information may be more difficult until our connections present it on their pages. We then start to explore other avenues and learn new things. The danger is being lead down the wrong path towards information that may not be reliable. As an adult, I have a broad range of networks - professional and personal. I am discriminatory in whose posts I read. I am able to make these decisions because I remain informed. That's where we can help our students, by guiding them down the correct paths, teaching them how to analyse and evaluate information, preparing them as productive global citizens. As a museum curator, I can deliver a different perspective on education. Museums are social learning environments where people from all ages visit. Observing how young children, teenagers and adults engage with exhibitions has encouraged me to take a more learner-centred approach. People choose to spend varying amounts of time at each exhibition according to their interest in the topic. Some visitors love to read, some prefer to watch videos, whilst others enjoy a tactile experience . The hands-on learning activities presented are examples of authentic learning tasks that I can take with me into the classroom. If I can share some of my thought processes with other teachers, maybe they can help me with the finer points of theory and content?
Invariably, I will learn more from a collective of wise people than from individual investigation. "Many hands make light work", some would say. I've already started developing my personal learning networks, the challenge will be to engage with them in an authentic manner. Providing insight to others is as valuable as receiving it. Critical and creative thinking is what I has been required of me this week! For some reason, Weebly hasn't been playing nicely. My embedded Google Drive link looked dodgy and posts kept disappearing and then magically reappearing! Maybe it's just my weird internet connection? I'm really struggling to communicate my thoughts, and collaboration has been more difficult than usual because of my fam-bam's work load (OK that would make my Gen Z kids cringe - an adult using teen talk!).  The four Cs of education- image created by author Looking at the above Four C's (critical thinking, communication, collaboration, and creativity), as explained by the National Education Association, I can see how they relate to the use of ICTs in the Humanities and Social Sciences Learning Area. Although several of the examples used in Social Studies relate to primary school students, I could adapt them for secondary applications. CRITICAL THINKING
COMMUNICATION
COLLABORATION
CREATIVITY
References: National Education Association. (c2012). Preparing 21st Century Students for a Global Society: An Educator's Guide to the "Four Cs". I can see it nowEDED20491 Topic 6 Reflection 1.1Fair dinkum learningEDED20491 Topic 6 Reflection 1.2Sometimes you can be lucky! After trolling YouTube for some interesting material on authentic learning, I was totally bored. Most of the material certainly didn't appeal to me, so how could I expect to entertain my readers? I changed tactic and thought about how museums create education programs to engage learners. Really?? You haven't had enough of my museum ramblings yet? See the smiling man in the video below? He is standing in front of some old wooden buckets that I have personally filled with water a hundred times or more. "Annie" was my name then, and I was an Irish convict servant at Elizabeth Farm in Parramatta, New South Wales. Education programs at Sydney Living Museum properties are designed to be authentic learning experiences. One component of the education program allows primary school students to experience how a convict servant was required to wash clothes for the household. Many young students had to wash Annie's bloomers - but I only told them them were 'mine' after they had hung them out to dry :),
Pedadigi capabilitiesEDED201491 Topic 6 Reflection 1.3I've embedded my working table for Years 7 to 10 Humanities and Social Sciences General Capabilities. Pop on over to my Coconut Curator page for an insight into my personal pedagogy and how ICTs may enhance learning in my classroom.
EDED20491 AT1 Presentation software and apps 1.4 Week 5 Embedded Task 3 CC0 Public Domain CC0 Public Domain Oh my goodness, I am tired! Curriculum schmiculum - my head is spinning! Thankfully, I can take a break from endlessly scrutinising documents to play with moving images :) The most logical place for me to start is somewhere I already know - a museum! I couldn't help but be drawn to the Virtual Museum PowerPoint presentation option presented in the unit materials this week (ha-hahaha). I have used Microsoft PowerPoint numerous times, but not very adventurously, I'm afraid. Fancy working at a museum and not EVER producing a virtual tour! Righto...let's see how this goes.
Now, I'm not going to delve into every aspect of PowerPoint as most readers will already be aware of how to use it. If you are new to the program, please click here for a tutorial.
Click on the brochure to take you to a simplified virtual tour of the museum. PS. I created the image/brochure with Microsoft Publisher (see my Pedadigipub post).  While I'm writing this, I'm waiting on my interactive presentation to upload to the Cloud to see if I can share it with you. Uploading it via SlideShare doesn't enable hyperlinks or transitions, so I have uploaded it to my Google Drive. You will need to download the AMNQ virtual museum tour here. Be aware, that if you try to download the show with Google Slides, the hyperlinks won't work either, so please use PowerPoint, if you can. Go to the Slide Show tab on the presentation and start from the beginning. Time to explore another feature of PowerPoint... I already had a boring old PowerPoint slide show laying around detailing the history of an object at the Army Museum North Queensland. Maybe I should tizzy it up a bit for this project? I'll add some special effects, transitions, timing and audio and export the package as a movie and upload it to YouTube. Wait, what!? The process would take much longer if I didn't have a presentation pre-prepared. I'm actually not going to detail the procedures, choosing to point you towards another tutorial instead. I've uploaded the finished PowerPoint video to YouTube and have embedded it below. S Substitute speaking with a PowerPoint and tell the students to just sit there and watch (OK so I am REALLY tired!). Actually, I would never do that - one sure way of inducing insomnia or raging hysteria through boredom. Let's start again: S: Year 7/8's: Use a PowerPoint as a visually stimulating teaching tool. Ask the students to take photographs of some interesting objects found laying around the house - ranging from really old to really new. Place the objects in a slide show and tell me where, when and how they are or were used and how much they cost. (Sensible objects only please). A Create a digital map of the locations where the objects might be found in their house. Create the map using PowerPoint - use boxes, arrows, images, as appropriate to locate the objects on the map. Create a series of slides - start with the map, then an object or two per page. Total the cost of the objects and create a table of values and comparisons. Transition and time the slides to present as an independent show - do not use the click next feature. M Let's create our own virtual tour! Using a virtual museum template, create a PowerPoint virtual tour of the house. Give each room a name on the entry page. Give a title to the presentation like "My House", or "The Mansion". Investigate the history of the object: Who made it? When was it invented? Are they found all over the world? Who uses the objects? What types of technologies were used to make the object? What kind of impact does the technology have on the environment? Include all of the information about the object as a label on the slide. Keep words to a minimum and use correct grammar. Hyperlink every object to the correct slide. R Design your own PowerPoint virtual tour template. Students start from scratch. Create a theme - look at possible locations. Will it be a house, museum, forest, underwater? The location could be subject-specific. In the Humanities learning area it could be an ancient greek building (Year 7 history) or a lake (Year 7 Geography). Choose an environment. Find or take images of 10-15 objects that might be found in that location. Students may download images labelled for reuse on non-commercial reuse, seek permission to use other's images or take their own photos. Reseach the objects and the locations as described in the previous section. Create a virtual tour of the chosen location. Hyperlink objects, change shapes, add effects, embed sound snippets of the objects or animals included in the presentation. OR Instead of a virtual tour, students create a PowerPoint presentation based on the same history/geography exercise. Using more complex transitions and creative themes, the slides must also contain a title page, an audio commentary and music. Export the slideshow as a movie and present it to the class. No more than 25 slides please! Reviewing safety concerns, the rules will be clearly stated at the beginning of each task. No offensive images, by respectful and only link to safe and appropriate sites. PowerPoint is used in most education settings, so there is no problem using the program, sharing presentations will need more caution and guidance. Ok, so maybe I did enjoy all of this :),
EDED20491 Embedded Task 1.6... Digital Tools 2 - Digital Media 1I am staring down the barrel of a cyclone, so why on google earth am I writing this blog? Actually, google earth is the whole point. Huh? You see, I've been wrapped up in all this cyclone business, looking at radar images, comparing tracking maps and listening to news reports. Ah ha!! Why couldn't I use this analytical data in my blog and link it to my pedagogy? One of the HASS strands is geography - wouldn't this make a great classroom activity? I'll need to explore this idea later... first I need to implement my disaster preparedness plan. I started this blog on Saturday, during the few moments of internet connectivity I had that day. I wanted to get my brilliant ideas down before I forgot them in all the chaos. Actually, the chaos had more to do with the three days of cyclone preparation than the cyclone itself! If I was to compare my readiness for the cyclone and link back to Reflection 1.1 (How prepared am I?) our family scored 7 on the scale for disaster preparedness. On Wednesday, we had done the weekly grocery shopping. Our pantry and fridge were full, but I made a dash to the supermarket on Friday to retrieve some more supplies. BIG mistake! Empty shelves everywhere - no torches, bread or UHT milk to be found anywhere. Luckily, I keep a disaster kit in the shed. We often have blackouts up here, so we have plenty of candles and battery-operated lamps, and purchased a generator after cyclone Yasi. What we weren't prepared for was the outdoor mess we had to deal with. Two days later and our house and cyclone-rated shed are jam packed with furniture, plants, bicycles, weight benches, and so many more items - even the old kitchen sink! After a mad rush to the dump late Sunday afternoon, we could rest easy regarding the outdoor component of our preparedness. Hearing the news that cyclone Debbie had moved further south, complacency set in for most Townsvillians. Monday afternoon - time to fill water buckets and glad-wrap the louvred windows - just in case! We were prepared, but not ready.  Pic made with MS Publisher by author It is now Tuesday evening and the eye of the storm has passed through the Whitsundays and crossed the mainland at Airlie Beach. We escaped the fury of Debbie in Townsville, but understand only too well the devastation that the cyclone will leave behind. Our thoughts and prayers are with those in the impact zone. With limited time this week, I decided not to reinvent the wheel. As a museum curator, I have created many interpretive text panels and backgrounds for displays. Microsoft Office tools were supplied by my employer, so I found ways to use the programs to enhance exhibitions.  Screenshot of an image's 'Properties/Details' tabs Screenshot of an image's 'Properties/Details' tabs Images make up a large portion of the museum's collection. Volunteers have spent many hours digitising photos and documents, scanning them as TIFFs for safe keeping and referencing. There always seems to be a problem naming the image and being able to add all of the information required for referencing. There is a really neat feature that allows you to add as much information as you would like via properties. Right click on the selected image, before opening it, select Properties, then go to the Details tab. Within this tab are several categories where you can add information. The Title and Subject fields allow you to type or paste information. This information becomes embedded metadata that can help with searches. It is also useful when you find an image on the web that you would like to copy and need to remember the source or add information. This little tip is worth teaching to your students! Microsoft Publisher is my go-to application for creating text panels. Publisher offers a similar screen layout to other MS programs such as Word and PowerPoint. Novice Publisher users shouldn't have too much trouble with navigation if they have used Word or PowerPoint previously. Often promoted as a marketing tool, MS Publisher allows you to do so much more. Publisher allows the user to create documents from a wide range of templates: brochures, posters, banners, greeting cards, business cards, invoices, labels, flyers and the list goes on. You can open a blank page and create your own template, or import entire word documents as well as photographs and graphics. Publications can be saved in a variety of formats, such as: pdf, jpg, png, gif, web page, word doc or simply as a Publisher file (pub). The ability to access images stored in your own files or directly from the web makes importing them a simple process. Once the photos are inserted, there are many manipulation features available. I love the picture effects such as shadow, reflection, glow, soft edges, bevel and 3-D rotation. Word art is easy to insert and fill effects are endless. The sizing and print feature of Publisher allows you to create very large documents, dependent on the dimensions of the paper available. I use a large format printer at the museum, so I am able to create text panels up to 140 cm wide and 30 m long. The file can be saved on your own device, or saved to the printer for access at a later date. I have saved many Publisher files to my Google Docs and accessed them from different devices. From the Share button in the File menu of Publisher, you can directly share your publication via email as: the current page, PDF, XPS or an attachment. If you email a publisher (pub) file to someone, you must be sure that they have the program installed on their own device, or they won't be able to open it. Alternatively, the recipient could convert the Publisher file to a PDF when they receive it using a conversion tool. I usually send a PDF copy via email for viewing or editing. You can also save a page as a photo (jpg) at different resolutions (96 dpi is a suitable resolution for uploading to the web). The document could also be uploaded to the web by exporting it as an html file. My favourite aspect of Publisher is layering. Inserting text boxes and having the option to overlap images and text, bringing objects forward or sending them backward, enables the user to be very creative. There are many fonts to choose from and you can add text to inserted shapes which may also be altered. Changing the page background is simply done by clicking a button and selecting the appropriate colour, pattern, file picture or online image. There are too many features to list in this blog, so I have provided a link to the Publisher help page if you are interested in learning more. There are many ways to take a photograph, such as on a camera, phone, by screenshot or clipping tool. I use Microsoft Paint for basic image cropping and adjustment, but sometimes the program is just not powerful enough. MS Office doesn't have everything, so I seek additional software that is free to use and to download. I discovered GNU Image Manipulation Program (GIMP) about 2 years ago as a wonderful alternative to Adobe Photoshop. Gimp works across several platforms, including Linux, Os X and Windows. According to the website, Gimp is free software, and you can change its source code and distribute your changes. I have yet to explore all of the features, but I have a few skills under my belt and enjoy playing with the features, although connecting to the help feature can be problematic. After manipulating images with Gimp, they are saved by default as an xcf file (GIMP image). If you want to save them as photos, choose the export tool. I can insert the exported images into my Publisher documents (see example below), or print them independently as exhibition backdrops. If Queensland students download the education suite of Microsoft Office, Publisher is included and GIMP is free, so I think the combination of these programs would allow for creative exploration of ICT in the classroom.  Using GIMP with publisher (pic created with Publisher by author) Now to implement the use of these tools according to SAMR and Blooms Cognitive Taxonomy, referring to the pic I created in an earlier blog (Blooming Taxes), to see how these two models interrelate. I am going to use this for modelling a geography lesson, linking to my learning area of Humanities and Social Sciences. In Year 7, students study ‘Water in the world’ and ‘Place and liveability’, examining the classification of environmental resources and the forms that water takes as a resource (ACHGK037). Amongst other things, students look at the causes, impacts and responses to an atmospheric or hydrological hazard (ACHGK042). A quick search on Scootle provided a resource link to cyclones. The plan has an external resource embedded and you will be redirected to another site. Understanding cyclones using MS Publisher as a learning toolFor comparative purposes, I have created another exercise using MS Publisher and images as learning tools in my post Mysterious Imaginings. SUBSTITUTION: We could keep a track of a cyclone's progress by updating and following links on our blog and posting images of the cyclone's progress or effects. I could create a Publisher document for the students, using information gathered from my own research into cyclones, and present it to them as a substitution. AUGMENTATION: Looking at different models generated by several sources, I would provide a link to the standard Bureau of Meteorology (BOM) website as the go-to point of information. Students would be required to save the cyclone identification map as an image and save images from other sites which may contain cyclone activity information. They would then be asked to place the images side-by-side in a Publisher document for comparison. The next step would be to upload the comparative image created onto the blog page. Students would be encouraged to take their own photographs of waterways and weather (providing they don't stand outside in the middle of a cyclone with their camera). Applying and remembering what they have learnt, students may then examine each others' photos and come up with solutions for problems gleaned from the images, such as blocked drains affecting run-off, resulting in possible flooding. MODIFICATION: Students could find other resources that contradict the BOM cyclone track model. The lesson could be expanded to explain the difference between cyclones and hurricanes - we could create a diagram in Publisher to explain the differences. This involves the thinking processes of analysis and evaluation. Students could create a table or an info-graphic in Publisher, showing the effects of storm surge, or design their own cyclone category table. Publisher documents, saved as web pages or html files, could be uploaded to the blog for collaborative discussion. REDEFINITION: Create a brochure in publisher explaining cyclones. For numeracy: look at measurement tools of distance and air pressure. Look at weather patterns and tracking maps. Students will need to locate resources and develop their own models based on research. They could look at the effects of climate change on weather patterns and develop rainfall distribution graphs. How do Aboriginal and Torres Strait Islanders traditionally read weather patterns? Students could create their own track map - inserting a map of the pacific region, drawing lines, work out timings and linking tabulated data. Students could then look at generating an info brochure for the general public. This brochure could also be designed as a web page for embedding in the blog. Looking at ethical, legal and safety protocols, students would need to ensure that the images they use and access are appropriate. Images of other students or children should NOT be published without permission and a release form must be signed by the parents. They would also need to ensure that the images are able to be freely used under Creative Commons or referenced accordingly. By accessing information in the properties of images, we could also identify ownership, enabling an element of transparency. Students would need to look at duplication, particularly if we are going to design something for publication - has a very similar product been developed before? We must be sure that all information provided is not plagiarised and is referenced when required. These aspects and more could be raised in the classroom prior to the commencement of work as an inclusive exercise, allowing students to develop their own framework and the rules could be placed on our blog page as an image created with Publisher. Engaging students through imagery is not limited to the teacher providing an information sheet or showing the class a few photos. Allowing students to be actively involved in the creation of the media provides a much better learning experience. I see this every day at the museum. Volunteers who had previously only thought of printing a word document sheet for display now search for images that may be incorporated. They have started to design their own Publisher templates and each time they create a new document, their understanding of the media and the subject matter improves. When visitors find a text panel visually appealing, they tend to become more engrossed in the exhibition, spending more time studying the information, walking away not only enjoying their experience, but learning something from their visit. Using Publisher, I created the infographic below for the museum. The image imparts information in a visually appealing manner. This type of info-graphic is something that the students could easily replicate. Not only does it require ICT skills, but its creation also covers the learning areas of literacy and numeracy (note there are also several different forms of measurement and calculation used). Interpretive diagram made by author using MS Pub, as a template for museum weapon or vehicle display If you can't tell by now, I LOVE using Microsoft Publisher. The 2016 version has super cool features, but develops a glitch when designing very complex publications - an issue involving lag and images jumping around the page which hasn't been resolved yet. Older versions don't seem to have this problem, but the design features aren't as flexible as the latest version.
Publisher has many possibilities as a learning tool in the classroom, especially when combined with other media. Employing numeracy skills, students could even calculate documents' sizes and how much paper on the roll would be used with each publication. I hope my students enjoy using Microsoft Publisher - will you? EDED20491 Reflection 4.1 ImagesImagine all the things we could do with blogs in a classroom, using even the simplest image! There are so many ways to make and use images! I haven't had time to explore them all this week. As an exercise in gleaning information from images. I have inserted a photograph of a mystery object on this page. The colour boxes contain exercises, representing the SAMR levels of a simple exercise that could be incorporated into the blog page for a history class. Mystery object
You may post your answers in the comments section of this blog. A Extension exercise
If you have found the answer to these questions, please continue with your research. Find images of people/places/things that may be associated with the objects above and provide either:
Always remember our class rules about safety and ethics when accessing and posting information. Please acknowledge the work of others. M Create an object label Using Microsoft Publisher, create an object label to accompany the object.
R Design a display Design a small exhibition, using the objects in the image as your main focus.
Poddling alongEDED20491 Reflection 4.2 PodcastsUsed in the classroom, podcasts and audio could open up a world of possibility. Accessing and recording information in this manner helps the listener or learner to retain information.
Moving ImagesEDED20491 Reflection 4.3 VideoSometimes, videos can teach us more than the written word. An engaging format, video can bring a subject to life. There are many ways to create videos: iMovie, PowerPoint, Windows Movie Maker, Audacity, Nero, the list goes on. I have used all of these methods to create movies for museums (except iMovie because I have only just received one as a birthday gift and have yet to play with it extensively). The movies that I have created are fairly basic really. They don't have to be fancy to get the message across. Videos with sound embedded have been received tremendously at the museum. One video (made with PowerPoint) is really just a slideshow of images from World War One, with music from the era embedded. Each image has a caption containing the details of where and when it was taken. The context has been announced on the title page. The video is quite long, yet visitors will sit and watch the video until its completion. If the images were framed and placed on the wall, I highly doubt people would examine each one thoroughly (we wouldn't have the space to hand all the images anyway). This is an indication that video is an excellent format for presenting images and imparting information. One visitor was so impressed that he went home and created his own video on Vietnam and presented it to me for use in the museum. A Answer the following questions:
M Create your own video about how World War II started
Always remember our class rules about safety and ethics when accessing and presenting information. Please acknowledge the work of others. R Create your own video about Australia's military involvement during World War II
Always remember our class rules about safety and ethics when accessing and presenting information. Please acknowledge the work of others. A few web sites for your consideration: National Film and Sound Archive Digital Learning History Extra Podcasts Watch Know Learn ABC Splash EDED20491 Week 3 Embedded Task 1 - Summary Blog Posting - Assessable  Pic created with MS Publisher by author Pic created with MS Publisher by author This exercise was my first blogging attempt, but not my first experience with web-page design. As the curator of an army museum, I have written stories about other people - a LOT of stories! I tend to stay away from advertising too many personal details about myself or my family, because of cyber safety and the joys of the world-wide-web holding onto your data forever. If you google me, you will get a few hits, most of them work-related. You will also find links to information about my children such as school-related articles. One day, whilst googling myself (I know, sad, right?), I found my daughter's Instagram profile was completely accessible to everyone - EVERYONE! Ahhhh!!! I ran into her room (panic-stricken) and discovered that she had inadvertently changed a setting. I was concerned about privacy when assigned this task as a requirement for my Graduate Diploma of Learning and Teaching. I set up a Blogger account first, but wasn't thrilled with the layout features. Then I set up a page on Wikispaces, but didn't really like that either. Next step, Weebly - ah, now that's a little more fun! Ooh, YES, I can optimise this site for mobile devices too - students will like that!
I investigated Weebly to source its potential for use in the classroom. There is a wonderful option provided (for a fee) that allows a school or individual teacher to set up a page. Instructions for doing this can be found here. If I was using this for school, students and other teachers could become members and we could nominate editors. We could set the page access to private and keep it for members only. Alternatively, we could publish the site and share our work globally. If we were worried about offensive comments on posts, then we could block that feature or set the rule to review before posting. I found this Weebly thing a little tricky at first and I've played with web-page design before! I'm not sure how a novice would go, although Weebly does provide a beginner's guide. Navigation back and forth between design elements can be fiddly and it is not easy to align text with photos. When writing my first blog post, I embedded one photo in a text box but I didn't exactly know how I did it. I tried to embed the next photo and things went hay-wire... then suddenly it leapt into the column! I've almost got the hang of it now, but embedded pictures can still jump all over the page in editing mode, which can alter the structure.
 Screenshot of email zip options for Weebly Screenshot of email zip options for Weebly Students will need to keep a draft of their postings or they could lose everything. I noticed that you can get a zip file of your site sent to the administrator's email address. I would need to make sure that is done regularly as a backup. You could also save each page as a PDF using the print function in Google Chrome - that would help retain information.  CC0 Public Domain Pixabay CC0 Public Domain Pixabay I took note in Blogger where it is possible to publish a blog post, then withdraw it from publication, edit the post and republish. That option is not available in Weebly, where you edit the post in published mode or delete it altogether. There is no taking it offline for a while - you MUST delete the post. Mistakes could easily be made by students here. It is very easy to embed links to websites within text; and uploading photos, providing links to them and giving captions is a breeze. I LOVE that I can choose from a gazillion fonts for the title bars, headings and text panels, but I can't alter them on every page (unless I upgrade to the paid version). I can add colour boxes, but can't alter the colour of the page, or provide a background picture to the page. YouTube clips and flash files are simple to add, which Generations Z just loves (see Reflections 1.1-1.3), and you can change the size of the videos. Embedding documents and other files can be tricky (see Reflection 3.1, Blogalicious) but after investigating various methods, such as saving word docs as a web page, it doesn't have to be scary. I enjoyed the use of colour-blocking to add coherency across the site and to make sections pop (see Reflection 2.1, Pedagogiwhat?). Weebly offers the option of adding apps to the editing tools. I have installed two free apps so far - the Back to Top arrow and Text Animation (I have added both to this page). There are more offered, some free but you must pay to use others. Many enhancement tools can be used in Weebly and I may explore these as I progress with my blogging. Even though Weebly is fun to play with, it is VERY time-consuming if you want everything to look pretty. Once you get the hang of it, the editing process gets easier. I think students would find this an exciting challenge! It would embrace their current knowledge of technology and allow them to further develop their skills. We could do all sorts of things - post assignments, write diary blogs, create videos and embed them, provide links to other sites, design projects, participate in other group projects, provide and receive feedback. The collaborative aspect of blogging is wonderful! Cohorts have provided some terrific feedback. One person in particular, directed me to her post which provides an excellent example of using blogging as an ICT tool for HASS, describing an activity that follows the SAMR guidelines. Other people have sent me private emails to discuss the weekly activities. Every time we work together, we develop our higher order thinking skills. Taking my cue from the post mentioned above, I realised that I need to expand my expectations of blogging. I created a small exercise to demonstrate the SAMR principles, using the Year 9 Queensland Curriculum for history and the topic of the Industrial Revolution. The first step would be to set some guidelines about access and appropriate use of the blog. These guidelines would also be placed on the blog. This exercise uses the blog at the Substitution level – for understanding and remembering. At the same Substitution level, I could embed a document onto my blog which outlines the topics of technology and transport. When looking at the SAMR level in conjunction with Bloom’s Cognitive Taxonomy, students would need to read, understand and remember this material. They would also need to remember to look at the blog! Next, I could post a small, Gen Z appropriate, YouTube video (see below) and ask them to answer a series of questions about the clip to engage them further at the Augmentation level. They would need to take note of key messages embedded in the clip and investigate them further. This would involve understanding, remembering and applying knowledge. They might be redirected to YouTube to look at similar videos and possibly learn and understand more about history. To work our way up the SAMR scale, to the Modification level, students could respond to comments about the embedded video and get ideas from each other. Adding to that, students could post photographs, quotes from articles, or video links relating to the Industrial Revolution. They would be asked to embed links in the photos and ensure all material was referenced. Students would be encouraged to comment on each other’s posts, providing constructive feedback and listing alternative sources of information. These activities involve higher order thinking processes, applying their knowledge, analysing sources and evaluating their significance. Looking at the Redefinition level, students would be asked to record their answers to the questions using an app like Vocaroo, or create their own group videos and upload them to the blog. The emphasis would be placed on the quality of information provided and the sharing of knowledge, not necessarily the quality of the video. The visibility of this task would encourage students to carefully consider their answers to ensure accuracy and validity, achieving the goals of evaluating, collaborating and creating. Given time and more experience, I am sure that I could think of many more ways to use blogs in a classroom. I have thought about how I could maintain blogs for all of my classes and came up with the idea that I could create ONE website, but have different blog pages for each year level. With both of my teaching areas closely related, I could have HASS pages for years 7 and 8 and History pages for years 9 -12. I wonder if that will work... hmm?? In fact, blogs themselves could become part of the historical record! EDED20481 Reflection 3.1 Blogs CC0 Public Domain, via Pixabay CC0 Public Domain, via Pixabay
I find this blog writing exercise delicious fun! I don't find the reading of course materials quite as enjoyable, sorry. I enjoy the blogging bit, not the deciphering of information bit. My last blog was all about getting my head around terminology and was rather tedious in its presentation. Now that I have examined SAMR and Bloom's Taxonomy, I can attempt to employ my knowledge to the use of blogging as an ICT tool in the classroom.
Someone commented on one of my blog posts suggesting that my use of humour would be handy in the classroom. I guess that might be a starting point for my own pedagogy...? I reflected on my own teaching styles in my previous blog and realised that I have a rather fluid style of teaching. That might be because I have presented information to diverse audiences. Saying that, I guess secondary students fall into that category too. Therein may lie my strength. When I speak to people, I reason how they will respond. Sometimes that makes my conversational language become a little choppy. Sometimes I don't consider my words enough before blurting out my thoughts. I will need to carefully consider my communication methods with students. That's why I'm enjoying blog writing - I can write what I think, then go back and edit it. Unfortunately, you can't do that in a classroom. You need to be clear in what you are saying. I LOVE that I can embed photos, links, videos and other forms of multi-media into blogs. If I like doing this so much, then using this integrational approach should be easy to do in the classroom - SURELY!!?? If there were enough hours in the day, I would conduct every class using colourful language (appropriate of course) and engaging ICT tools. That may not be very practical. I will need to start small, I think. Using the Enhancement stage of SAMR. I will use ICT as an augmentation to the lesson and then progress up the levels as my own skills improve. As I move up the levels, taking my students with me, I would act more like a facilitator, directing students to resources and helping them improve their skills. Once I get a group of collected works under my belt, either from external sources or by creating my own, then I can use technology for learning and teaching more extensively, helping students develop higher order thinking skills.
· Visual learning tool • Post assignments, publish and share articles, provide links to other sites or research • Embed a variety of multimedia • Monitor student progress • Identify areas where students need assistance • Identify skills otherwise undiscovered • Interact on a global basis • Collaborate with other schools • Publish research and findings • Provide and receive feedback • Teach about cyber safety and privacy • Develop literacy skills • Participate in the use of other applications • Diary/journal thoughts • Communicate with parents • Create networks of like-minded people or groups • Develop creativity • Provide news to the community • Provide deeper levels of learning within a digital environment • Should be interactive to engage and retain attention • Should be appealing to entice readers • Can be informal or formal but should be interesting
After I wrote this list, I thought I'd better undertake further investigation into the use of blogging in the classroom. This article raised some great points and made me realise that I could use blogging as an evaluation tool, rather than merely a creative journaling tool.
Will I use blogging as part of my pedagogy? I'm unsure yet. It will be dependent on several factors: school policy, resourcing, enthusiasm of students, and time. I would want blogging to be an inclusive process. If there are resources available at the school, great! If there are members of the class from a low socio-economic background, participating in blogging from home might be problematic. At the very least, I would show the students how to create a blog, using responsible, safe and ethical practices. Blogging is a wonderful exercise in developing literary skills. The creative aspect of blogging makes it an engaging way to share and discover information, cultivating global connections. Without the collaboration aspect enabled by commenting on posts, I would not have seen my own ability to use humour as part of my pedagogy. I have learnt an enormous amount through blogging and have no doubt that my students could too, but have I taught you anything yet? Tiki wikiEDED20491 Reflection 3.2 Wikis for Learning By Kupakai (Own work) [CC BY-SA 3.0 (http://creativecommons.org/licenses/by-sa/3.0)], via Wikimedia Commons By Kupakai (Own work) [CC BY-SA 3.0 (http://creativecommons.org/licenses/by-sa/3.0)], via Wikimedia Commons
Setting up a wiki didn't really float my tiki boat. What a convoluted way of doing things! No, really! I think most of us have not had a pleasant experience with this. The evidence is in the number of accessible Wikispaces sites on our Moodle page. I have yet to find one that works properly or that students are using for their blogs. Even the page where we upload our blog addresses is problematic. Only one person can edit it at a time. Mistakes are easily made and another person's work may be overwritten. I guess that is what a page administrator is for - to fix mistakes and make sure everything is done correctly.
Don't get me wrong, I understand that Wikispaces Classroom must be a good platform for educators owing to the number of people using it. It just doesn't look very pretty. That might be part of the appeal - a simple interface. At the Substitution and Augmentation levels, wikis can be used for organisation and timetabling. The ability to publish posts by multiple authors is very useful and the collaboration process moves the use of wiki up the SAMR scale into the Modification level. When I looked at the Education Blog section, I discovered that you could access information from all over the world. There are some fantastic articles published with terrific links embedded. In some cases, the comments section contains almost as much information as the article or blog. One story that I found would be extremely useful for teaching history. The author explains how wikis encourage students to share their historical knowledge and use critical thinking skills to comment on other posts. By making history visible, the students are engaged and wikis can be used as transformational technology. I can see that wikis hold value at the Redefinition level when students are required to use high order thinking skills for participation. You may access my wiki page here, but it is rather uninteresting. WebweaverEDED20491 Reflection 3.3 Websites
As mentioned in Reflection 3.2, I didn't find Wikispaces very user friendly. Consequently, I chose to set up my blog on Weebly. It is so much more appealing, both visually and in its structure. I understand that wikis are good for collaborative work, but there are ways to work around this on blog sites (using post comments is one).
The diagram below is a tabulated response to ways in which my Weebly blog could be used in the classroom, following the SAMR model. I will be teaching history and HASS, so blogging will provide a wonderful extension for these subjects. At the lower order levels of Substitution and Augmentation, blogs could be used like a diary, informing students and parents of impending doom, such as assignment due dates! There are apps that can successfully perform this task, like Class Dojo, but blogs have an entirely different way of interacting on the higher levels.
I must admit, Silvia Rosenthal-Tolisano's 2014 post on blogging with SAMR helped me immensely with this task.
I could write so much more about Weebling, but I think that I might leave that for my next reflection and assessable task....
EDED20491 Reflection 2.1Pedagogy - the word tangles on my tongue! What does it mean in everyday words? Put simply, it is the way we teach. How was I taught? How am I going to teach? What experience do I already have? Although I have presented many workshops over the last few years and have been a mentor to student interns, I have not taught in a school setting. I am a visual and kinaesthetic learner - I like hands-on participation. How does that happen when there is a need to impart a truck-load of information? My methods in the past have included the use of ICT in the form of PowerPoint, images and video. I might begin my classes by standing out the front, talking, but I actually prefer sitting. If people are comfortable with me, then they respond better and participate more. I have found that the type of audiences I address prefer a less formal presentation - they seem to be more comfortable asking questions that way. This might not be possible when teaching in schools, where I will need to take a more authoritative position in the class. I usually hand out extra information in either paper or electronic form, such as a disc or USB, to accompany the workshop and that people can read at their own pace. I'm sure that students would LOVE that and be dedicated to hours of reading after class (not). This week, course participants were asked to complete a table and take the categories as headings and apply them to our blog. The information from the table has been transferred to the categories listed below. Even though my responses to the way I have done things in the past read quite positively, I now understand just how much I need to learn and how far I have yet to go. Deep knowledge and higher order thinking
 By Love Krittaya (Own work) [Public domain], via Wikimedia Commons Collaborative and social learning
Knowledge as complex and linked to interests and experience
Problems that are real and relevant to students
Student direction
Explicit quality performance criteria
Cultural knowledges & Active citizenship
 By Rahulkepapa (Own work) [CC BY 3.0 (http://creativecommons.org/licenses/by/3.0)], via Wikimedia Commons Blooming TaxesEDED20491 Reflection 2.2Oh me oh my - why? Why am I doing this?? It is because I want to become a good educator! I must confess this task really did my head in. I have spent many late nights trying to grasp the whole meaning of taxonomy, models and pedagogy. One thing I do understand is that students learn in a myriad of ways. It is important for educators to understand the theories of learning to develop our own methods of teaching. Two models of teaching and learning prevalent in the modern education system are Blooms Taxonomy and SAMR. Understanding these two models and how they embrace the use of ICT's in the classroom is important for development as teachers in order to help students achieve high order thinking skills. Without the effective use of ICT, students have a lower chance of applying acquired knowledge to the real world. One student from the Graduate Diploma of Learning and Teaching course, makes some excellent points on the use of ICT in the classroom (carlyrobbins.weebly.com/weekly-reflections): The use of ICT to merely present content or to have students undertake quizzes or programmed learning does not represent high level pedagogy. Activities such as these do not encourage a deeper understanding of the material, present the students with problem based activities or enable the students to own and manage their learning.  Diagram made by author Diagram made by author Let's examine the first model... In 1956, Dr Benjamin Bloom developed a taxonomy for teaching and learning that has evolved over time. The original formula unfolded during a collaborative process involving a group of educational psychologists. They used a series of levels to define what educators want students to know: Knowledge, Comprehension, Application, Analysis, Synthesis, and Evaluation (Huitt, W., 2011). Bloom's Cognitive Taxonomy was revised in 2001: Knowledge became Remembering; Comprehension became Understanding; Application became Applying; and Analysis became Analyzing (Huitt, W., 2011). The two bottom levels depict remembering, understanding and applying, signifying lower order thinking skills. These skills are important for building the foundation of the pyramid. Basic understanding, including background knowledge, is required before you can progress up the levels. Technology may be used an an aid in laying this foundation. Analyzing, evaluating and creating are associated with high order thinking skills. Skills learnt here develop from information learnt in the the lower levels. Learners understand how to analyse information and apply it to the real world. Technology used can progress skills and lead to a deeper level of understanding. Collaborative use of technology helps to develop knowledge at this level. According to Robyn Collins (2014), higher order thinking involves:
The SAMR Model for integrating technology into teaching, was developed by Dr. Ruben Puentedura. Understanding the critical need to use ICT in the classroom, the model has four levels: Substitution and Augmentation are in the lower Enhancement levels; and Modification and Redefinition make up the higher Tansformation levels. Depending on their skills, teachers might start at the Augmentation level. Students are so much more tech-savy than many educators and will sometimes expect more advanced uses of technology in the classroom. The types of technology available can often be restricted by budget.
A fabulous resource which explains how SAMR and Bloom's Taxonomy work together is Dr Rueben Puentedura's Weblog (Ruben R. Puentedura's WeblogOngoing thoughts on education and technology). There are links to pdf's created by Dr Puentedura which give example of how SAMR can be used in the classroom. One particular document helped me understand how the two correlate by blocking levels together and placing the models side-by-side (www.hippasus.com/rrpweblog/archives/2014/12/11/SAMRandTPCK_HandsOnApproachClassroomPractice.pdf). I have created the diagram below, explaining the correlation between the two using colour-coding for each model. Arrows show how Dr Puentedura categorises the relationships. 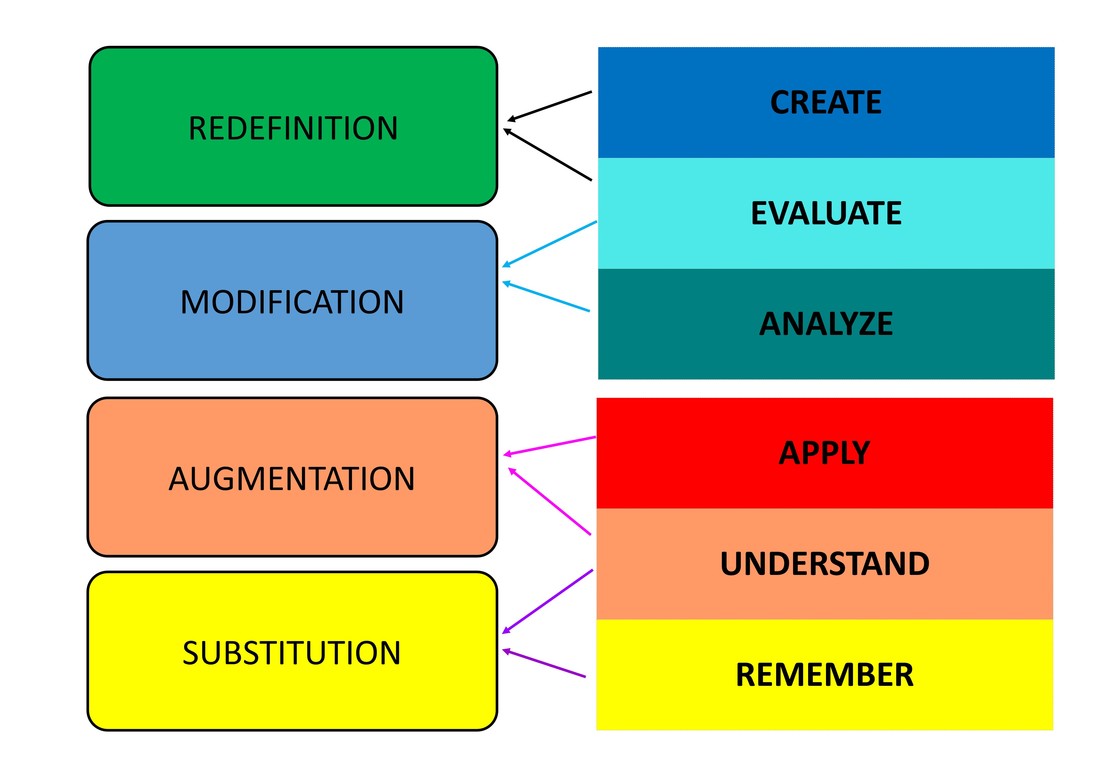 Diagram made by author Diagram made by author As educators, our pedagogy will be largely shaped by SAMR and Bloom's Taxonomy. When applying these models at the lower levels, we need to employ ICT in the classroom to enhance learning. At the higher levels, we need to find ways to allow students to engage with technology in more meaningful ways. Please view the following YouTube clips which show how Bloom's Taxonomy can be adapted to the digital world and how ICT is relevant in the SAMR model. For me, everything became clearer... References
Collins, R. (2014) Skills for the 21st Century: teaching higher-order thinking’, Retrieved from: www.curriculum.edu.au/leader/teaching_higher_order_thinking,37431.html?issueID=12910 Huitt, W. (2011). Bloom et al.'s taxonomy of the cognitive domain. Educational Psychology Interactive. Valdosta, GA: Valdosta State University. Retrieved from: www.colorado.edu/AmStudies/lewis/1025/bloomtax.pdf. |
AuthorAmanda is a museum curator and pre-service teacher, learning how to integrate technology with education to design creative learning tools for secondary school students. Archives
May 2017
Topic 6: Growing your pedagogy
Embedded Task 3 Embedded Task 2 Reflections 4.1-4.3 Embedded Task 1 Reflections 3.1-3.3 Reflections 2.1-2.2 Refelections 1.1-1.3 Categories |


 RSS Feed
